cs410.net
![]()
Hands-On Day 1: Environment!
Login to the GIBBS compute cluster
-
We need an SSH client! Mac and Linux come with a client. Windows also recently added an ssh client to PowerShell and Command Prompt, though you may use PuTTy if you prefer.
-
OFF-CAMPUS ONLY: We probably need a VPN connection: https://vpn.umb.edu, download client and use
vpn.umb.edufor the portal address. Here are detailed instructions (including Linux): https://www.umb.edu/it/vpn -
We can also first connect with the unix account:
ssh UNIXACCOUNT@users.cs.umb.edu(Unix Account Signup is here: https://portal.cs.umb.edu/accounts/register/), and then connect with the command below from there. -
ssh UMBusername001@gibbs.umb.eduor via PuTTy
Setup Conda Environment
Load Anaconda
-
We will load conda for the GIBBS cluster (or install miniconda on your own machine).
-
On GIBBS type:
module load python/anaconda3.7 -
You type
conda init—this will modify your.bashrcfile. -
To reload the
.bashrcfile, please logout (you can typeexit) and login again.
Create Environment
-
To create a new environment, type:
conda create --name CS410 python=3.7.3 -
Now we activate the new environment:
conda activate CS410 -
You should see the current active environment at the console prompt
(CS410)instead of(Base). -
Here is a good cheatsheet for conda: https://cs410.net/notes/conda.pdf
Install Jupyter Notebook
NOT REQUIRED!
conda install jupyter
Install GIT
If git is not a valid command, do the following:
conda install git
or load the module
module load git
Create and Clone Github Repository
-
Go to github.com and sign in
-
Create new repository
CS410firststepsand choose initialize with README and .gitignore for Python and MIT License -
click the green button Clone or Download and copy the URL
-
on GIBBS use the url to clone it with this command:
git clone URL(replace the URL with the actual URL) -
Here is a good cheatsheet for git: https://cs410.net/notes/git.pdf (I always start with
git statusto get an idea of the local state)
Tmux
-
NOTE: TMUX MIGHT BE ALREADY INSTALLED.. TRY
tmux -
Tmux allows you to keep a session on the cluster open and supports tabs/panes in the terminal.
-
To install
conda install -c conda-forge tmux -
Then run
tmuxand a green bar shows up in the bottom of the terminal -
We need do re-activate our conda environment
conda activate CS410 -
Here is a useful Tmux Cheatsheet https://tmuxcheatsheet.com/
Connect to Compute Node!
-
On GIBBS, we always first connect to the login node
gibbshead -
To run code, we need to connect to a compute node with the following command
srun --pty -t 24:00:00 --export=ALL --ntasks=1 --mem=8000 /bin/bash(this will give us an interactive shell with 8GB Ram for 24 hours), best is to run this command in a tmux window -
Now we can check the hostname of the compute node with
uname -a(it should not begibbsheadanymore but maybegibbs02or some other name!)
C++ Session
Create Hello, World Example
-
Find some C++ example, like this one: http://cplusplus.org/
-
Create a new file
vi hello.cc(any extension is fine) -
Switch to INSERT vi mode by pressing
i -
Paste the code.
-
Press ESCAPE to exit INSERT mode and type the following to write and quit
:wq
Compile Hello, World
-
Type
g++ hello.ccto compile the code. A filea.outis generated. -
Type
./a.outto run the code. -
You can also do
g++ -o hello hello.ccto name the compiled executable and then run it with./hello
Python Session
Configure Jupyter Notebook
-
jupyter-notebook --generate-config -
vi /home/UMBusername001/.jupyter/jupyter_notebook_config.py -
add the following three lines at the bottom of the file:
-
c.NotebookApp.ip = '0.0.0.0' -
c.NotebookApp.open_browser = False -
c.NotebookApp.port = YOUR_ASSIGNED_NUMBER
Install Matplotlib
conda install matplotlib
Start Jupyter Notebook
-
In tmux, after activating our conda environment, you can run
jupyter-notebookto start the notebook server. -
But without Tunnel, this is pretty useless.
Setup Tunnel to Gibbs
-
We need to tunnel through the
gibbsheadlogin node to the compute node where jupyter notebook is running. -
You can find the name of the compute node with
uname -a -
On your local machine type
ssh UMBusername001@gibbs.umb.edu -L YOUR_ASSIGNED_NUMBER:localhost:
YOUR_ASSIGNED_NUMBER ssh gibbs00.gibbs.local -L YOUR_ASSIGNED_NUMBER:localhost:YOUR_ASSIGNED_NUMBERand, of course, replaceYOUR_ASSIGNED_NUMBERwith the one you used above during configuration of jupyter. Also, replaceUMBusername001with your username (all lowercase) and replacegibbs00with the gibbs node you connected to usingsrunearlier. -
If a Windows user would rather use PuTTy than the ssh client included with PowerShell, they can follow one of the tunneling instruction below. https://blog.devolutions.net/2017/4/how-to-configure-an-ssh-tunnel-on-putty https://serverfault.com/questions/340865/ssh-tunnel-over-multi-hops-using-putty
Mount repo via sshfs
-
Using sshfs allows you to edit your files ‘locally’ and in-sync with the cluster directory. For this, we need a local mountpoint and create a directory:
mkdir CS410firststeps_cluster -
Type
ssh -f UMBusername001@gibbs.umb.edu -L 2233:localhost:22 -N -
And then
sshfs -p 2233 UMBusername001@localhost:/home/UMBusername001/Projects/CS410firststeps
` CS410firststeps_cluster` (replace UMBusername001 with your username). -
Windows users can install the sshfs Windows port linked below. They include instructions and a gif displaying how to use it once installed. The path you would use is
\\sshfs\UMBusername001@gibbs.umb.eduwithUMBusername001replaced with your username. https://github.com/billziss-gh/sshfs-win
Create new Python Notebook
With the tunnel from above, you can access the jupyter notebook from
your local browser using
http://localhost:YOUR_ASSIGNED_NUMBER.
You need to copy the token value from the terminal where you run jupyter
notebook on gibbs (just the part after ?token=). Then, please paste
the token into the browser to login to jupyter notebook. There, you use
the “New” button to create a Python 3
notebook.
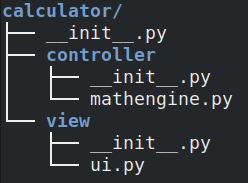
Create Python Package Structure
Packages are a good way of structuring your code. In class, we learned about the Model-View-Controller (MVC) pattern and created the following folder structure. See https://slides.com/haehn/cs410_lecture10#/10 for details and code!
Use Autoreload Extension
In jupyter notebook, we can use the autoreload extension. This extension
allows us to modify code in .py files and call the updated code in our
notebook without restarting the kernel. This allows for fast developing.
Warning: if function signatures change, we always need to restart the
kernel!\
%load_ext autoreload
%autoreload 2